

Docker is a platform that allows developers to develop, deploy, and run applications in containers. Containers are lightweight and portable virtual environments that package up an application and its dependencies, so the application can run consistently across different environments.
Docker containers are the runtime instances of Docker images. Docker images can be shared and distributed through Docker registries, such as Docker Hub or Amazon ECR.
Docker Image is a read-only template that contains the instructions for creating a container. It is like a snapshot of a container at a specific point in time, and it includes all the files, dependencies, and configuration settings needed to run the application.


The major difference between a container and an image is the top writable layer. All writes to the container that adds new or modifies existing data are stored in this writable layer.

Contents
- How containers improved development process?
- How container’s can improve the deployment process?
- Basic Docker commands:
- Container port vs Host port
- Containers vs Virtual Machines
- Docker Architecture and its components
- Docker Container Lifecycle Management
- Docker network
- Dockerfile
- Docker Compose
- Troubleshoot a Docker container
- How to push an image to Docker Hub
- Docker Volume
- How to reduce the size of a Docker image and make it faster to download?
- Multi-stage builds
- Moving Images Across Hosts
- Docker Restart Polices
- Understanding Image Layers
- Docker Swarm
How containers improved development process?
How we develop applications before containers:
Suppose you have a team of developers working on some applications, you would have to install most of the services on your operating system directly. For ex, You are developing some JavaScript application and you need PostgreSQL & Redis and every developer in the team would have to go and install the binaries of those services and configure them and run them on their local development and so we can see that:
- Installation process different on each OS environment.
- Many steps of installation and so something could go wrong and error.

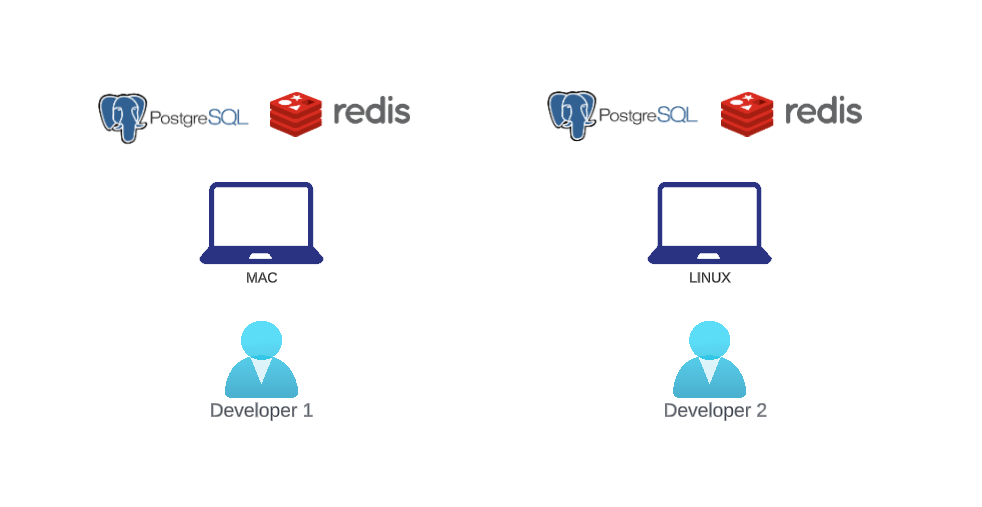
If we have 10 services that our application is using then we have to install 10 times in each OS environment.
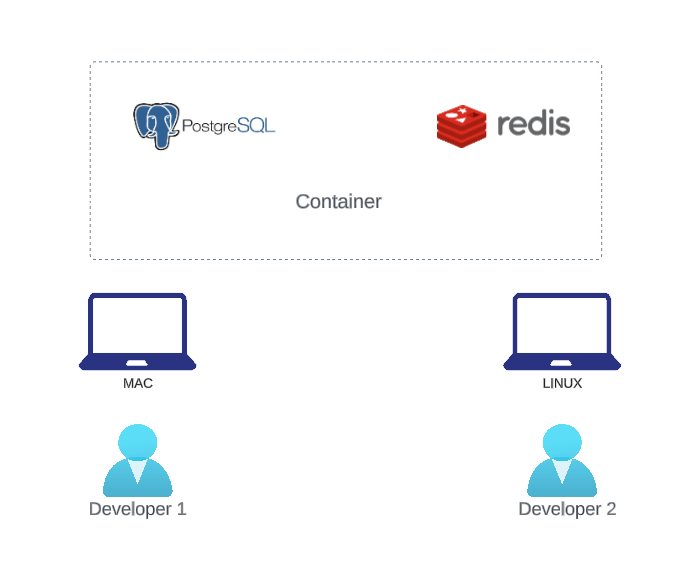
Let’s see how containers makes our life easy:
With containers, we do not have to install any of the services directly in our OS environment because the container has its own isolated operating system environment. We have everything packaged in one isolated environment so we have the PostgreSQL & Redis with specific version and the download step is just one docker command which fetches the container and starts it at the same time and regardless of which OS you’re on, the docker command for stating the container will be same. We can also have different versions of the same application running on our local environment without any conflict.

How container’s can improve the deployment process?
Before the containers, a traditional deployment process will look like this:
Development team will produce artifacts together with a set of instructions of how to actually install and configure those artifacts on the server. So you would have a jar file or something similar for your application. And in addition, you would have some kind of a database service or some other service also with a set of instructions of how to configure and set it up on the server.
So development team would give those artifacts over to the operations team and the operations team will handle setting up the environment to deploy those applications. Now, the problem with this kind of approach is that, first of all, you need to configure everything and install everything directly on the operating system, which we saw in the previous example that could actually lead to conflicts with dependency version and multiple services running on the same host.
Other problems that could arise from this kind of process is when there is misunderstanding between the development team and operations because everything is in a textual guide as instructions. So there could be cases where developers forget to mention some important point about configuration. Or maybe when operations team misinterpreted some of those instructions and when that fails, the operations team has to go back to the developers and ask for more details.
With container, the developers and operations working in one team to package the whole configuration dependencies inside the application, just as we saw previously. And since it’s already encapsulated in one single environment and you’re going to have to configure any of this directly on the server. So the only thing you need to do is run a docker command that pulls that container image that you’ve stored somewhere in the repository and then run it.
Basic Docker commands:
docker infodocker info will show you a summary of the Docker daemon, including its status. If the daemon is running, you’ll see a line that says “Docker daemon” with the word “Running” next to it.
docker run --name demo -d -p 80:80 docker/getting-startedThis command is used to run a container from an image.
–name : used to assign a name to a Docker container
-d : run the container in detached mode (in the background)
-p 80:80 : map port 80 of the host to port 80 in the container
docker/getting-started : the image to use
Note: Firstly it’s going to take around 5 minutes to download this one image because we don’t have this locally. But if we were to download the next version, it will take a little bit less time because some layers already exist on our local machine.
docker psThis command is used to list running containers. You can use options such as -a to show all containers, including stopped ones.
docker ps --format="ID\t{{.ID}}\nNAME\t{{.Names}}\nImage\t{{.Image}}\nPORTS\t{{.Ports}}\nCOMMAND\t{{.Command}}\nCREATED\t{{.CreatedAt}}\nSTATUS\t{{.Status}}\n"This command is used to customize the output of the docker ps command, which is used to list all the running containers on a Docker host
docker imagesThe docker images command is used to list all the Docker images that are currently available on your local machine.
docker search <image_name>
docker search <image_name> --limit 5
docker search --filter is-official=true <image_name>
This command will display a list of Docker images available on Docker Hub
docker pull nginxdocker pull is a command used to download a Docker image from a Docker registry.
docker stop idThe docker stop command is used to stop a running Docker container.
docker start idThe docker start command is used to start a stopped Docker container.
docker logs idThe docker logs command is used to view the logs of a running or stopped Docker container.
docker inspect idThe docker inspect command is used to retrieve low-level information about a Docker container or image. This information includes details about the container’s configuration, network settings, mounted volumes, and more.
docker exec -it my-container bashThe docker exec -it command is used to run a command inside a running Docker container. This command allows you to interact with the container’s shell and execute commands as if you were logged into the container directly. It creates a new process in the container’s environment.
docker rm idThis command is used to remove the container with the specified ID
docker container prune -fThe docker container prune -f command is used to remove all stopped containers from the Docker host. The -f option is used to force the removal of the containers without asking for confirmation.
docker diff my-containerThe docker diff command will output a list of all the files and directories that have changed in the container’s filesystem since it was created
docker commit my-container my-image:latestTo create a new image from the running container named my-container and tag it as my-image:latest
By default, the container being committed and its processes will be paused while the image is committed.
docker system dfThis command is used to display disk space usage related to Docker on your system. It provides information about how much disk space is being used by Docker containers, images, and other related components.
docker system df -vThis command is used to display detailed information about disk space usage related to Docker on your system. This command provides a more comprehensive breakdown of how much disk space is being used by various Docker components.
docker image history nginx When you run this command with the nginx image, it will show you a list of the image’s layers and the corresponding commands that were used to create each layer.
IMAGE               CREATED             CREATED BY                                      SIZE
nginx               2 weeks ago         /bin/sh -c #(nop)  CMD ["nginx" "-g" "daemon…   0B
<missing>           2 weeks ago         /bin/sh -c #(nop)  STOPSIGNAL SIGTERM           0B
<missing>           2 weeks ago         /bin/sh -c #(nop)  EXPOSE 80                    0B
<missing>           2 weeks ago         /bin/sh -c #(nop)  ENTRYPOINT ["docker-entry…   0B
<missing>           2 weeks ago         /bin/sh -c #(nop)  CMD ["nginx" "-g" "daemon…   0B
<missing>           2 weeks ago         /bin/sh -c #(nop)  STOPSIGNAL SIGTERM           0B
<missing>           2 weeks ago         /bin/sh -c #(nop)  EXPOSE 80                    0B
<missing>           2 weeks ago         /bin/sh -c #(nop)  ENTRYPOINT ["docker-entry…   0B
More Commands:
docker stop $(docker ps -a -q)       # To stop all running containers
docker rm $(docker ps -a -q)         # To delete all stopped containers
docker rmi -f $(docker images -q)    # To delete all images
Container port vs Host port
By default, docker containers can make connections to the outside world but the outside world cannot connect to containers.
A container port is the port number that the application inside the container is listening on. By default, containers run in an isolated network namespace, and the ports used by the container are not accessible from outside the container. To make the container’s services accessible from the host or other machines on the network, you need to expose the container port to the host.
For example, to expose port 80 of a container running nginx to port 8080 on the host, you can run the following command:
docker run -p 8080:80 nginxThis maps the container’s port 80 to the host’s port 8080. You can then access the nginx web server running inside the container by visiting http://localhost:8080 in your web browser.
docker port my_containerThis command will output a list of all the ports that are exposed by the container, along with the host ports that they are mapped to.
docker container run -d --name webserver -P nginxThis command is used to run a Docker container named “webserver” in detached mode (-d) with automatic port mapping (-P) for an nginx web server image. This means Docker will start a container based on the nginx image, assign a random port on your host machine, and run the nginx web server inside the container.
Containers vs Virtual Machines

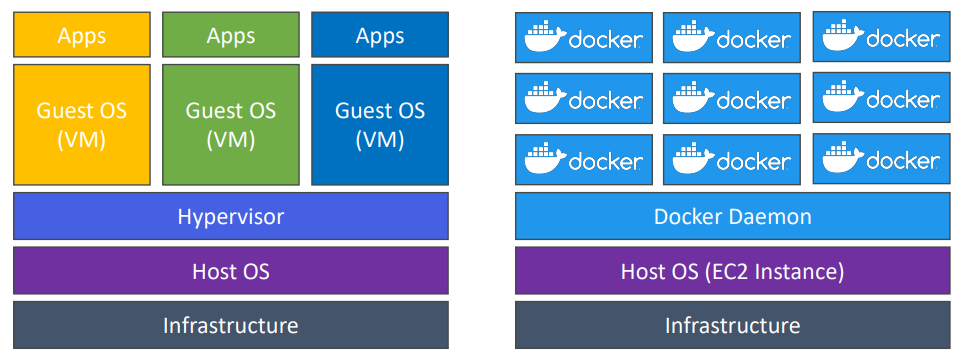

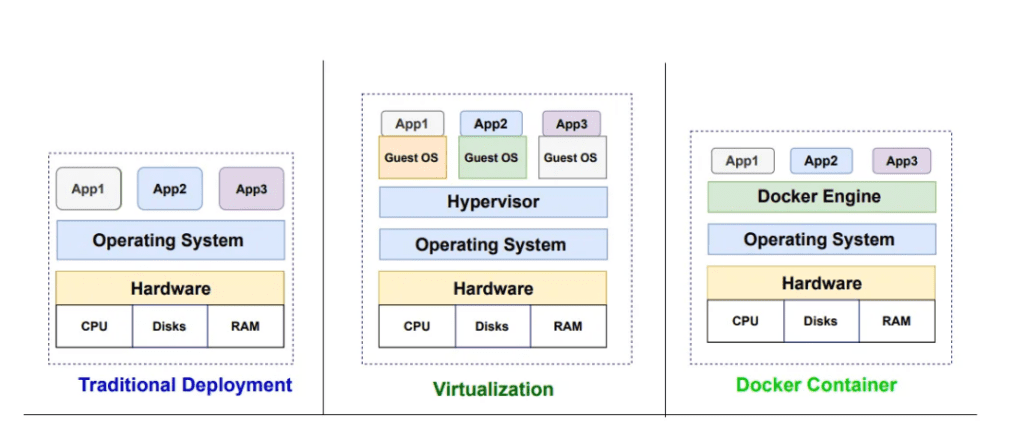
Virtual Machines
It runs on top of an emulating software called the hypervisor which sit between the hardware and the virtual machine. The hypervisor is the key to enable virtualization. It manages the sharing of physical resources into virtual machines. Each virtual machine runs its own guest operating system. Virtual machine is a hardware level virtualization.
VMs: VMware, VirtualBox, Hyper-V
Containers
Containers are lightweight, portable, and self-contained units of software that package an application and all its dependencies together. Each container is isolated from other containers, but they all share the same operating system kernel. Container is an OS level virtualization.
Containers: Docker, ECS
Docker Architecture and its components

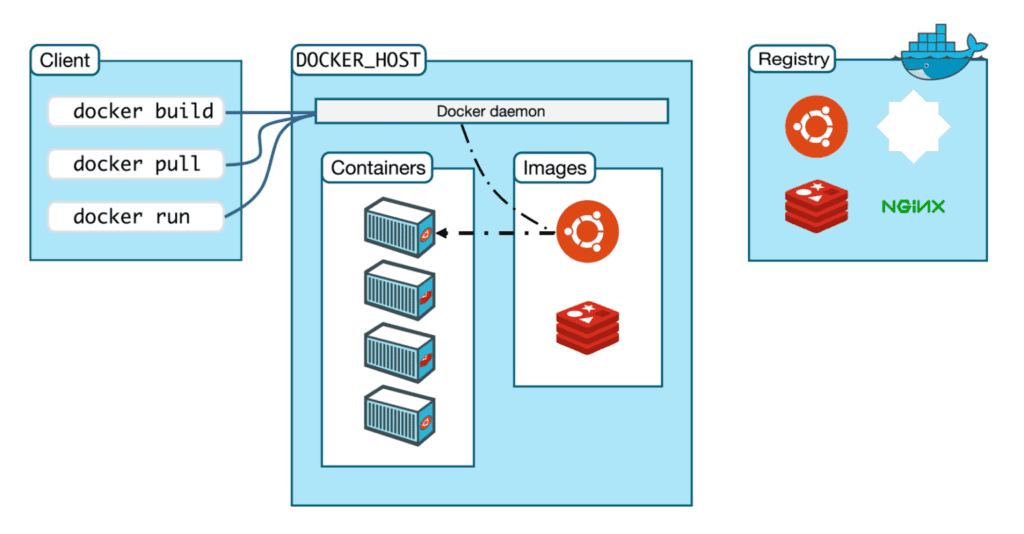
Docker makes use of a client-server architecture. The Docker client talks with the docker daemon which helps in building, running, and distributing the docker containers. The Docker client runs with the daemon on the same system or we can connect the Docker client with the Docker daemon remotely.
- Docker daemon: This is the core component of Docker, responsible for managing containers, images, and networks. It listens for Docker API requests and manages the entire Docker environment. Docker daemon runs on host OS. Docker daemon can communicate with other daemons.
- Docker client: The Docker client is a command-line tool that interacts with the Docker daemon. It allows users to build, run, and manage Docker containers and images.
- Docker registries: Docker registries are stores of Docker images. They allow developers to share and distribute their applications in the form of Docker images.
- Docker images: Docker images are read-only templates that contain a set of instructions to create a Docker container. They can be created from scratch or based on an existing image.
- Docker containers: Docker containers are the runtime instances of Docker images. They are isolated from the host system and other containers, providing a consistent and reliable runtime environment for applications.
- Docker networks: Docker networks provide a way for containers to communicate with each other and with the outside world.
- Docker volumes: Docker volumes provide a way to persist data generated by Docker containers. They can be used to store application data, configuration files, or any other files required by the container.
Docker Container Lifecycle Management

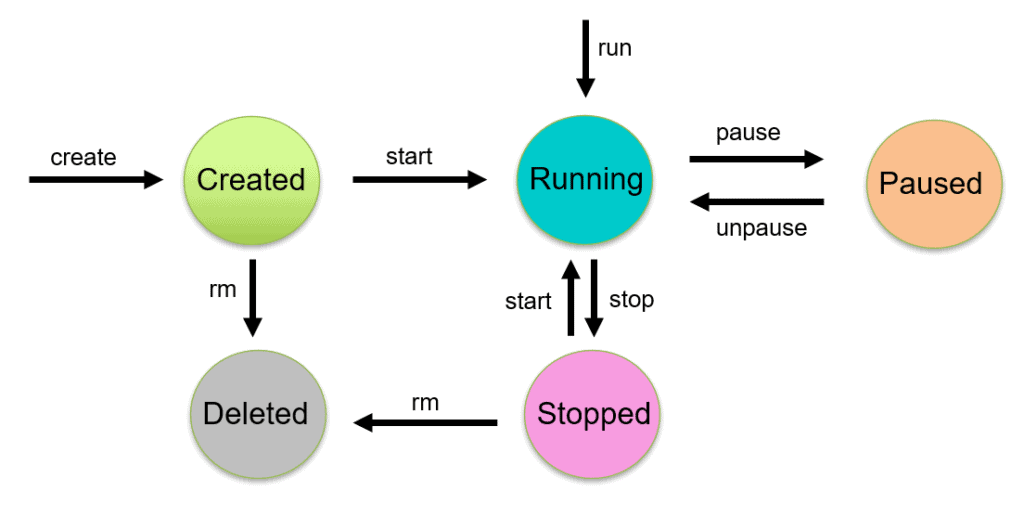
- Docker run: This command creates a new container from a Docker image and starts it.
- Docker start: This command starts a stopped container.
- Docker stop: This command stops a running container.
- Docker restart: This command stops and starts a container.
- Docker rm: This command removes a stopped container.
- Docker pause/unpause: These commands pause and resume a running container.
Docker network
Docker network is a virtual network that allows Docker containers to communicate with each other securely, regardless of the host machine’s physical network configuration.
docker network lsdocker network ls is a Docker command used to list all the existing networks on a Docker host.

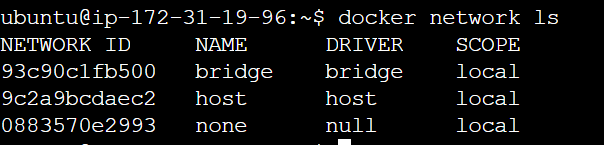
This output shows that there are three networks known to the Docker daemon: bridge, host, and none . The bridge network is a default network that is created when Docker is installed.
Types of docker networking:
- Bridge Network: This is the default networking mode in Docker. Containers on the same bridge network can communicate with each other using IP addresses or container names. Bridge networks also provide external connectivity, allowing containers to access resources outside the Docker host.
- Host Network: This network removes the network isolation between the docker host and the docker containers to use the host’s networking directly. This means the container uses the host’s network interface directly, without any network isolation.
- Overlay Network: Overlay networks enable communication between containers across multiple Docker hosts. This is useful for creating distributed applications or deploying containers on a cluster of machines.
- Macvlan Network: Macvlan allows containers to have their own unique MAC addresses and appear as separate devices on the physical network. This type of network is useful when you want containers to be directly accessible from the physical network, with each container having its own IP address.
- None Network: Containers on the none network have no network connectivity. This can be useful for scenarios where you want to completely isolate a container from the network.
- Custom Bridge Network: It creates a private network on the host machine, allowing containers to communicate with each other using container names as hostnames. Containers connected to the same bridge network can reach each other via IP addresses
ip address showThis will display a list of all the network interfaces of our instance, along with their IP addresses, subnet masks, and other associated information

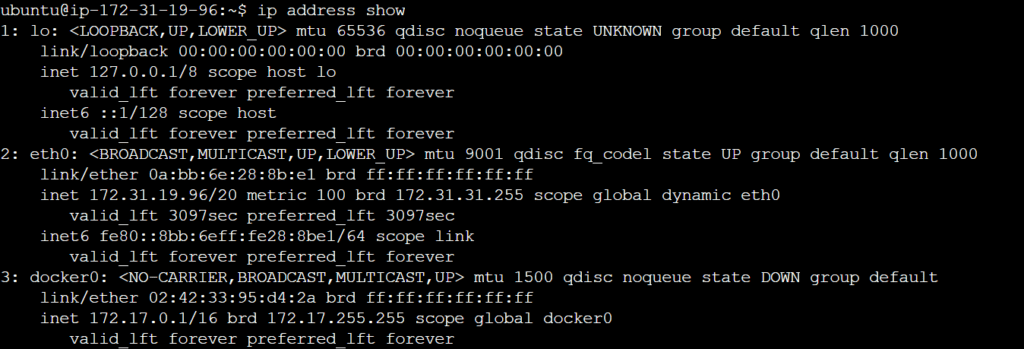
docker run -d --name nginx --network host nginxThe --network host option tells Docker to connect the container to the host network, which means that the container will be able to access all of the same ports and services as the host machine
Note: When you do docker inspect bridge you can see containers has ip address but when you do docker inspect host you can see containers hasn’t ip address because because container is running on our host ip address. This means that the container shares the host’s IP address and all of the host’s network interfaces. As a result, the container does not have its own unique IP address.
docker network create custom-networkThis command is used to create a new Docker network with the name “custom-network”.
docker run -d --name nginx --network custom-network nginxThe --network custom-network option tells Docker to connect the container to the custom network named custom-network.
Note: By default, Docker uses a networking mode called “bridge” to create an internal private network for containers on a host machine. When you start a container, it’s connected to this bridge network by default, and Docker assigns an IP address to the container from the IP range of that network.
Dockerfile
A Dockerfile is a text file that contains a set of instructions to build a Docker image. The Dockerfile typically starts with a base image, which is the starting point for building the image.
# Use an official Python runtime as a base image
FROM python:3.8-slim-buster

# Set the working directory to /app
WORKDIR /app

# Copy the current directory contents into the container at /app
COPY . /app

# Install any needed packages
RUN pip install

# Define environment variable
ENV PORT=3000

# Informs Docker that the container listens on the specified network ports at runtime
EXPOSE 4000

# Run app.py when the container launches
CMD ["python", "app.py"]
Once you have a Dockerfile, you can use the docker build command to create an image based on the instructions in the file.
docker build -t getting-started:latest .This command used the Dockerfile to build a new container image. The -t flag tags our image. The . at the end of the docker build command tells that Docker should look for the Dockerfile in the current directory.
Note:
Docker uses a layer cache to optimize the process of building Docker images and make it faster.
If the cache can’t be used for a particular layer, all subsequent layers won’t be loaded from the cache.


docker build -t without-cache .
docker build -t with-cache .
Difference between COPY and ADD
COPY takes in a src and destination. It only lets you copy in a local file or directory from your host
ADD lets you do that too, but it also supports 2 other sources:
- First, you can use a URL instead of a local file/directory.
- Secondly, you can extract a tar file from the source directly into the destination.
Note: Using ADD to fetch packages from remote URLs is strongly discouraged, you should use curl or wget instead.
Ex:
ADD http://example.com/big.tar.xz /usr/src/things/
RUN tar -xJf /usr/src/things/big.tar.xz -C /usr/src/things
RUN make -C /usr/src/things all

RUN mkdir -p /usr/src/things \
    && curl -SL http://example.com/big.tar.xz \
    | tar -xJC /usr/src/things \
    && make -C /usr/src/things all
HEALTHCHECK Instruction
A HEATHCHECK instruction determines the state of a Docker Container. It determines whether the Container is running in a normal state or not. It performs health checks at regular intervals. The initial state is starting and after a successful checkup, the state becomes healthy. If the test remains unsuccessful, it turns into an unhealthy state
FROM nginx:latest
HEALTHCHECK --interval=35s --timeout=4s CMD curl -f https://localhost/ || exit 1
EXPOSE 80- –health-cmd: Command to run to check health
- –health-interval: Time between running the check (default: 30s)
- –health-retries: Consecutive failures needed to report unhealthy (default: 3)
- –health-timeout: Maximum time to allow one check to run (default: 30s)
- –health-start-period: Start period for the container to initialize before starting health-retries countdown (default: 0s)
- –no-healthcheck: Disable any container-specified HEALTHCHECK
docker run -dt --name demo --health-cmd "curl -f http://localhost" --health-interval=5s --health-retries=1 busybox sh
Difference between CMD and ENTRYPOINT
CMD:
- The
CMDinstruction specifies the default command that should be executed when a container starts, but it can be overridden when the container is run. - You can have only one
CMDinstruction in a Dockerfile. - If multiple CMD instructions are provided, only the last one will take effect.
ENTRYPOINT:
- The
ENTRYPOINTinstruction specifies the main command that should be executed when a container starts, and it cannot be overridden when the container is run. - You can have only one
ENTRYPOINTinstruction in a Dockerfile.
ENTRYPOINT ["echo", "Hello"]
CMD ["World"]

docker run <image_name>  // echo Hello World
docker run <image_name> Bonjour // echo Hello Bonjour
Docker Compose
Docker Compose is a tool for defining and running multi-container Docker applications. It allows you to define your application’s services, networks, and volumes in a YAML file, and then start and stop them with a single command.
To use Docker Compose, you need to create a docker-compose.yml file that defines your application’s services. Once you have defined your services, you can use the docker-compose up command to start your application, and the docker-compose down command to stop it.
Example 1:
version: "3.5"
services:
  django_todo_app:
    container_name: "django-todo-app"
    build: .
    ports:
      - 8000:8000
    volumes:
      - demo-volume:/app
  mysql_db:
    container_name: "django-mysql-db"
    image: mysql:5.7
    ports:
      - 3306:3306
    environment:
      MYSQL_ROOT_PASSWORD: "test@123"
volumes:
   demo-volume:
Example 2:
version: '3.3'

services:
   db:
     image: mysql:5.7
     volumes:
       - db_data:/var/lib/mysql
     restart: always
     environment:
       MYSQL_ROOT_PASSWORD: somewordpress
       MYSQL_DATABASE: wordpress
       MYSQL_USER: wordpress
       MYSQL_PASSWORD: wordpress

   wordpress:
     depends_on:
       - db
     image: wordpress:latest
     ports:
       - "8000:80"
     restart: always
     environment:
       WORDPRESS_DB_HOST: db:3306
       WORDPRESS_DB_USER: wordpress
       WORDPRESS_DB_PASSWORD: wordpress
       WORDPRESS_DB_NAME: wordpress
volumes:
    db_data: {}
Troubleshoot a Docker container
- Check container logs: Use the
docker logscommand to view the logs of a container. - Check container status: Use the
docker pscommand to check the status of a container. - Check container configuration: Use the
docker inspectcommand to view the configuration of a container, including its environment variables and volumes. - Connect to the container: Use the
docker execcommand to connect to a running container and run commands inside it. This can help you diagnose issues and troubleshoot the container. - Check container resources: Use the
docker statscommand to view the resource usage of a container, including CPU, memory, and network usage.
How to push an image to Docker Hub
Step 1: To push an image, we first need to create a repo on Docker Hub
- Go to Docker Hub and log in if you need to.
- Click the Create Repository button.
- For the repo name, use
getting-started. Make sure the Visibility isPublic. - Click the Create button!
Step 2:
Login to Docker Hub by either clicking on the “Sign In” button in Docker Desktop or using the command: docker login
Step 3:
Tag the Docker image you want to push with your Docker Hub username and the repository name using the following command:
docker tag getting-started YOUR-USER-NAME/getting-startedStep 4:
Push the Docker image to Docker Hub using the following command:
docker push YOUR-USER-NAME/getting-startedThis will upload the image to Docker Hub and make it available for others to download and use.
Accessing in-secure Registries
By default, the docker will not allow you to perform the operation with an insecure registry. You can override by adding the following stanza within the /etc/docker/daemon.json file
{
“insecure-registries” : [“myregistrydomain.com:5000”]
}
Docker Volume
A Docker volume is a directory that exists outside of the container and is shared between containers. Volumes are the preferred way to persist data in Docker containers and services.
Here are some of the benefits of using Docker volumes:
- Data persistence: Volumes persist even when the container is stopped or deleted. This means that you can be sure that your data will be safe even if the container fails.
- Data sharing: Volumes can be shared between multiple container or even host to containers.
- Efficiency: Volumes are more efficient than bind mounts. This is because volumes are stored in a separate filesystem from the host machine, which can improve performance.
docker volume create --name demo-volume --opt type=none --opt device=/home/ubuntu/docker-projects/volumes/demo-volume --opt o=binddocker volume create: This is the command you use to create a new Docker volume, which is a way to manage and store data separately from Docker containers.--opt type=none: This option specifies that the volume will have no specific driver or type associated with it. It’s a simple, generic volume that doesn’t rely on any particular storage technology.--opt device=/home/ubuntu/docker-projects/volumes/demo-volume: With this option, you’re indicating the path on your host machine where the volume will physically store its data. In this case, the data associated with “demo-volume” will be kept in the directory located at/home/ubuntu/docker-projects/volumes/demo-volume.--opt o=bind: This option establishes a “bind” connection between the Docker volume and the specified directory. This means that the data stored in the Docker volume will also be directly accessible in the linked directory on the host machine, and vice versa. Any changes made in one location will be reflected in the other.
Once you have created a volume, you can mount it into a container using the docker run command
docker run --mount source=demo-volume,target=/data -dp 8000:8000 django-app--mount source=demo-volume,target=/data: This option specifies a volume mount for the container. It connects the “demo-volume” Docker volume (as the source) to the “/data” directory inside the container (as the target).
Example 2:
docker container run -dt --name mynginx -v /root/index:/usr/share/nginx/html nginx
docker container run -dt --name mynginx --mount type=bind,source=/root/index,target=/usr/share/nginx/html nginx
Note: Docker has two options for containers to store files in the host machine, so that the files are persisted even after the container stops: volumes, and bind mounts.
How to use VOLUME in Dockerfile
VOLUME ["/data"]
VOLUME ["/data", "/logs"]
docker volume lsdocker volume ls command lists all the volumes
docker volume ls --filter dangling=trueThis command to list all the dangling volumes. Dangling volumes are volumes that are not attached to any containers.
docker volume inspect myvolumedocker volume inspect command inspects a volume and displays detailed information about it.
docker volume rm myvolumeThis command will remove the volume named myvolume
To share volume with another containers
docker run -d --name <container_name> --privileged=true --volumes-from <container_name> <image_name>--name <container_name>: Here, you provide a name for the container you’re creating. Replace<container_name>with your desired name.--privileged=true: This option grants the container elevated privileges, which means it can access hardware devices and perform actions that are normally restricted. It’s often used when a container needs special access.--volumes-from <container_name>: This flag indicates that the new container will share volumes (data storage) with an existing container specified by<container_name>. Both containers will be able to access the same data.<image_name>: Replace this with the name of the Docker image you want to use for creating the new container.
To share volume [ Host <-> Container ]
docker run -d --name <container_name> --privileged=true -v /home/ec2-user:/<volume_name> <image_name>--name <container_name>: Sets the name for the container you are creating.--privileged=true: Grants the container additional privileges, which might be necessary for certain operations.-v /home/ec2-user:/<volume_name>: Creates a volume binding between the host machine’s “/home/ec2-user” directory and a directory inside the container (specified by “<volume_name>”).<image_name>: This is the name of the Docker image you want to create the container from.
How to reduce the size of a Docker image and make it faster to download?
- Use Alpine-based images: Alpine is a lightweight Linux distribution that is optimized for size and performance. Using Alpine-based images instead of larger images like Ubuntu or Debian can greatly reduce the size of your Docker image.
- Remove unnecessary files: When building your Docker image, make sure to remove any unnecessary files, such as temporary build files, cache files, or log files. This can be done using the
.dockerignorefile. - Use caching: Docker builds are incremental, meaning that if a step in the build process has not changed since the last build, Docker can reuse the cached results instead of re-executing the entire step. This can greatly speed up the build process and reduce the size of the final image.
- Multi-Stage Builds: Utilize multi-stage builds to separate the build environment from the runtime environment. This reduces the final image size by only including necessary runtime components.
Multi-stage builds
Multi-stage builds allows you to create efficient and smaller Docker images by utilizing multiple build stages within a single Dockerfile.
Example:
# Stage 1: Build Dependencies
FROM python:3.9 as builder
WORKDIR /app
COPY requirements.txt /app
RUN pip install
COPY . /app

# Stage 2: Create Final Image
FROM python:3.9-slim
WORKDIR /app
COPY --from=builder /app /app
CMD ["python", "app.py"]
Moving Images Across Hosts
Moving Docker images across hosts can be accomplished using various methods, depending on your specific requirements and infrastructure.
Docker Hub (Public Repository):
If your Docker images are publicly accessible and not sensitive, you can push them to Docker Hub, which is a public repository for Docker images. Others can then pull the images from Docker Hub to their hosts.
Private Docker Registry:
For more control and security, you can set up a private Docker registry (e.g., Docker Trusted Registry, Harbor) within your organization. This allows you to store and share Docker images privately.
Docker Save and Load:
You can save a Docker image as a tar archive and then transfer it to another host using any file transfer method (e.g., SCP, FTP, HTTP). On the target host, you can load the image from the tar archive.
docker image save busybox > busybox.tar
docker image load < busybox.tar
Docker Restart Polices
By default, Docker containers will not start when they exit or when docker daemon is restarted.
Docker provides restart policies to control whether your containers start automatically when they exit, or when Docker restarts.
no | Don’t automatically restart the container. (Default) |
on-failure | Restart the container if it exits due to an error, which manifests as a non-zero exit code. The on-failure policy only prompts a restart if the container exits with a failure. It doesn’t restart the container if the daemon restarts. |
always | Always restart the container if it stops. If it’s manually stopped, it’s restarted only when Docker daemon restarts or the container itself is manually restarted. |
unless-stopped | Similar to always, except that when the container is stopped (manually or otherwise), it isn’t restarted even after Docker daemon restarts. |
docker run -d --restart unless-stopped redisNote
- By default, containers that are exited are not removed by Docker.
- With the –rm flag, the user can specify that whenever a container exits, it should automatically be removed.
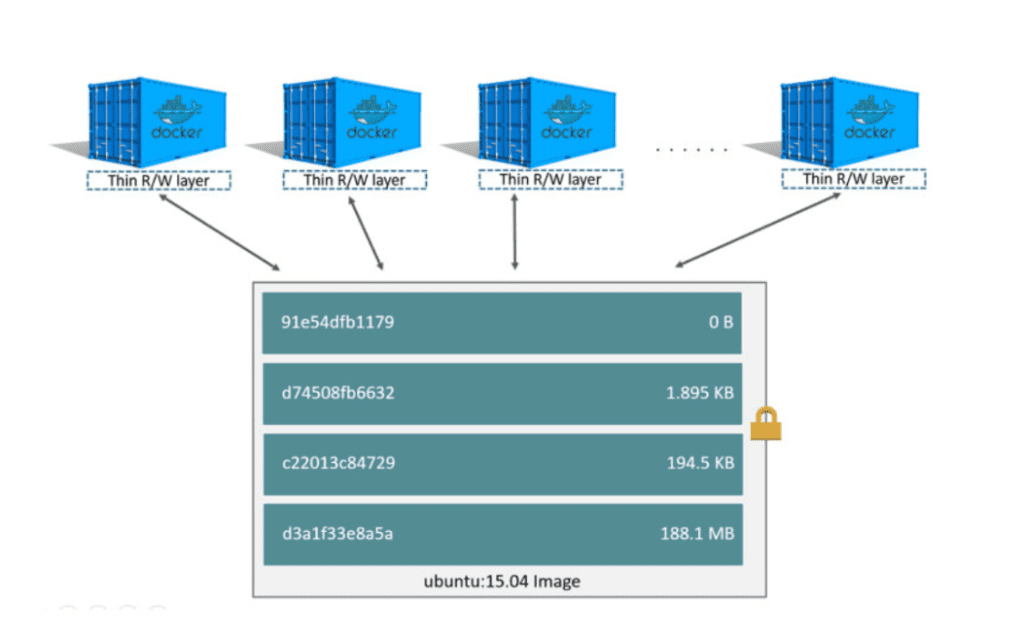
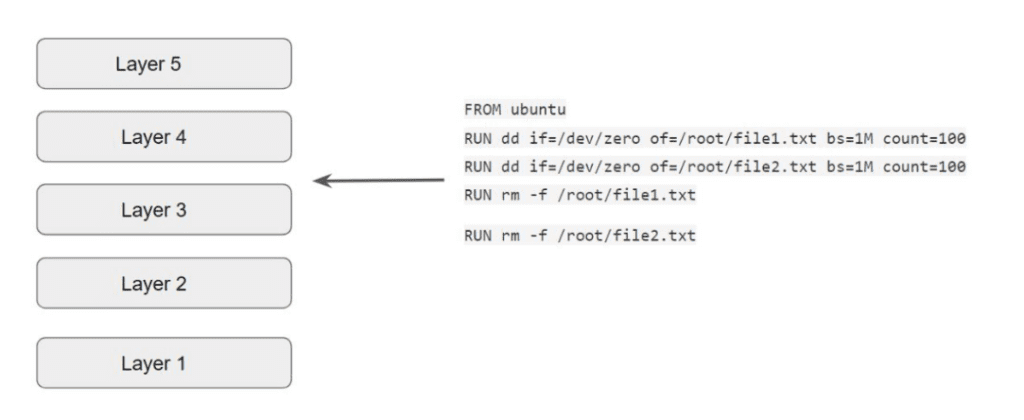
Understanding Image Layers


Docker Swarm
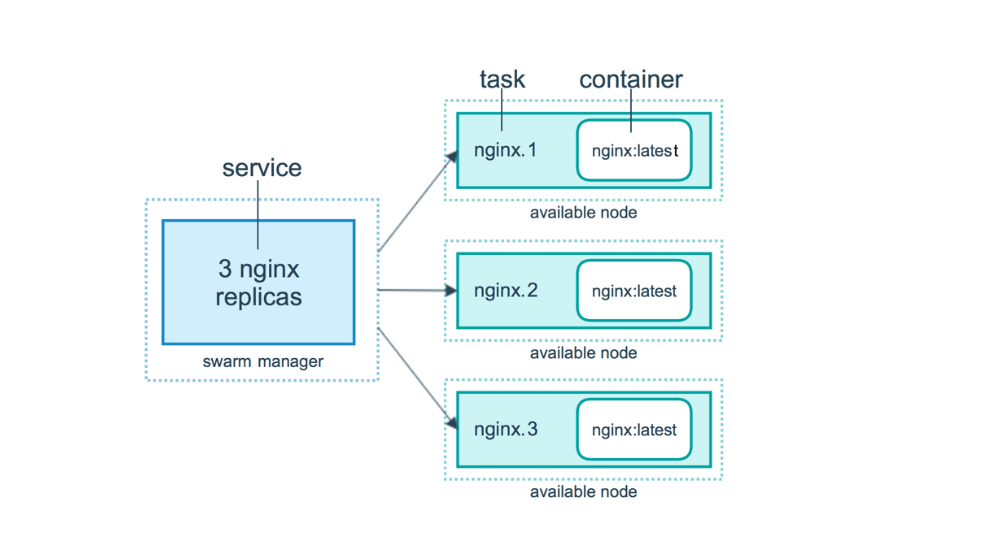
A Docker Swarm is a container orchestration tool running the Docker application. In a Docker Swarm, there are typically several worker nodes and at least one manager node that is responsible for handling the worker nodes’ resources efficiently and ensuring that the cluster operates efficiently.

Installation (all nodes)
sudo apt-get update
sudo apt-get install docker.io
systemctl status docker
sudo usermod -a -G docker $USER
sudo reboot
Initialize a swarm in master node
docker swarm init --advertise-addr 142.93.214.57Open port 2377 in your inbound security group of your master and copy and paste the join command in your worker node.
Show docker swarm nodes
docker node ls

To create a new docker service
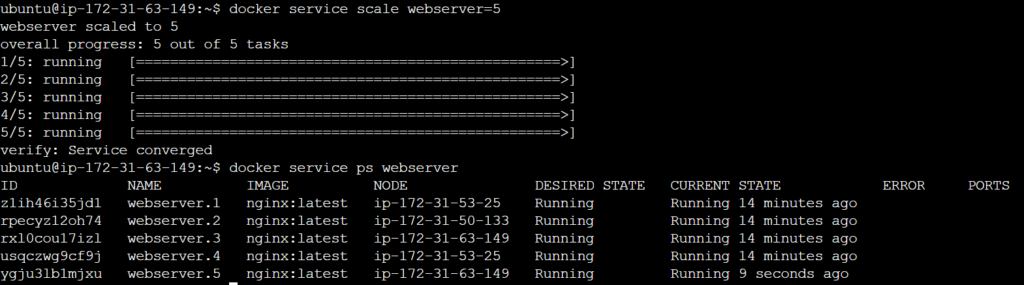
docker service create --name webserver --replicas 4 --publish 80:80 nginx
docker service ps webserver

docker service lsdocker service rm webserverdocker service scale webserver=5
Another way to scale
docker service update --replicas 4 webserverNote: Difference between both scaling commands
- docker service scale allows us to specify multiple services in the same command.
- docker service update command only allows us to specify one service per command.
docker service scale webserver01=3 webserver02=5Replicated vs Global Service
There are two types of service deployments: replicated and global
For a replicated service, you specify the number of identical tasks you want to run. For example, you decide to deploy an NGINX service with two replicas, each serving the same content.
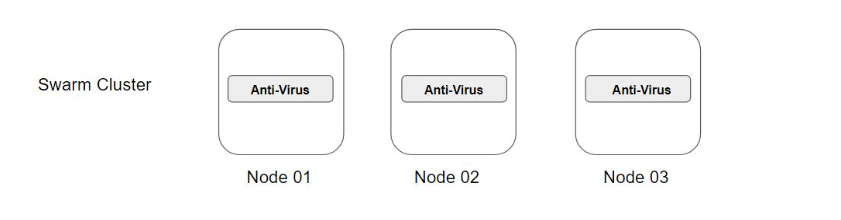
docker service create --name webserver --replicas 4 --publish 80:80 nginxA global service is a service that runs one task on every node. Each time you add a node to the swarm, the orchestrator creates a task and the scheduler assigns the task to the new node.
docker service create --name antivirus --mode global -dt ubuntu
Draining Swarm Node
Sometimes, such as planned maintenance times, you need to set a node to DRAIN availability. DRAIN availability prevents a node from receiving new tasks from the swarm manager. It also means the manager stops tasks running on the node and launches replica tasks on a node with ACTIVE availability.
To change the Node Availability to Drain
docker node update --availability drain swarm03Verify Node status
docker node lsTo change the Node Availability To Active
docker node update --availability active swarm03Inspecting Services and Nodes
Inspecting a Service
docker service inspect webserver
docker service inspect webserver --pretty
Inspecting a Node
docker node inspect swarm01
docker node inspect swarm01 -pretty
Docker Stack
A specific web-application might have multiple containers that are required as part of the build process. Whenever we make use of docker service, it is typically for a single container image. The docker stack can be used to manage a multi-service application.
docker stack deploy --compose-file docker-compose.yml mydemo
docker stack ps mydemo

docker stack rm mydemo

Locking Swarm Cluster
Swarm Cluster contains a lot of sensitive information, some of which includes:
- TLS key used to encrypt communication among swarm node
- Keys used to encrypt and decrypt the Raft logs on disk
If your Swarm is compromised and if data is stored in plain-text, an attack can get all the sensitive information.
Docker Lock allows us to have control over the keys.
docker swarm update --autolock=true
systemctl restart docker
docker node ls
docker swarm unlock
To retrieve key after swam is unlocked
docker swarm unlock-keyTo rotate the key
docker swarm unlock-key --rotateMounting Volumes via Swarm
docker service create --name myservice --mount type=volume,source=myvolume,target=/mypath nginx
docker volume ls
docker container exec -it [CONTAINER-ID] bash
ls -l /
cd /mypath/
touch demo.txt
exit
cd /var/lib/docker/volumes/
ls
cd myvolume/
ls
cd _data/
ls
Node Label Constraints
Swarm services provide a few different ways for you to control the scale and placement of services on different nodes.
- Replicated and Global Services
- Resource Constraints [requirement of CPU and Memory]
- Placement Constraints [only run on nodes with label pci_compliance = true]
To add a Label to Node
docker node update --label-add region=mumbai swarm03To Run task on Node label as Mumbai Region
docker service create --name webservice --constraint node.labels.region==mumbai --replicas 3 nginxJoin Tokens in Swarm
Join tokens are secrets that allow a node to join the swarm. There are two different join tokens available, one for the worker role and one for the manager role.
docker swarm join-token worker
docker swarm join-token manager
To print the token
docker swarm join-token -q workerIf a worker intends to leave swarm, run the following command:
docker swarm leaveOverlay Networks
The overlay network driver creates a distributed network among multiple Docker daemon hosts. Overlay network allows containers connected to it to communicate securely.
docker network create -d overlay my-overlayFor the overlay networks, the containers can be spread across multiple servers. If the containers are communicating with each other, it is recommended to secure the communication.
docker network create --opt encrypted --driver overlay my-overlay-secure-networkNote: Overlay network encryption is not supported on Windows. If a Windows node attempts to connect to an encrypted overlay network, no error is detected but the node will not be able to communicate.
Swarm Routing Mesh
Routing mesh enables each node in the swarm to accept connections on published ports for any service running in the swarm, even if there’s no task running on the node.


docker network lsNote:
By default manager nodes also act as worker nodes. This means the scheduler can assign tasks to a manager node. For small and non-critical swarms assigning tasks to managers is relatively low-risk as long as you schedule services using resource constraints for CPU and memory.
To avoid interference with manager node operation, you can drain manager nodes to make them unavailable as worker nodes:
docker node update --availability drain <NODE>When you drain a node, the scheduler reassigns any tasks running on the node to other available worker nodes in the swarm. It also prevents the scheduler from assigning tasks to the node.